

Create Flower Text
Step 1.
Start of by making a new photoshop document, with dimensions of 200x200 and a white background. Create some large, thick, light green (DBF5AD) text, preferably with rounded corners. I used Arial Black 200 pt for this, so I had to round off the the corners (image b).

Step 2.
Make a selection using the text and then fill it with a darker green (2F8B48) on a new layer. Now feather (select > feather) and contract (select > modify > contract) the selection by 7 pixels, and then delete the area that's selected (image b).


Step 3.
Create a layer below the first 2 and then make a selection using the text again. Expand the selection by 3 pixels and then fill it with a lighter green 3. (A8CFAF).

Step 4.
This is the 2nd part of the Photoshop tutorial to create text with flowers. Next, zoom in to 200% and create a new layer and a path layer. Use the pen tool to create a curve (image a) and then drag the top segment of the directional line to the center (image b). Create a second curve, complete the path, make a selection using it, and then fill the layer with dark green (2B8E00).


a b c d
Step 5.
Feather the selection by 2, contract it by 1 and then fill it with a lighter green (B4FF92). So that's the first stalk create that we'll duplicate later, but first we're going to create some flowers. So, zoom in to 300%, create a new layer and then select the gradient tool. Set it to linear gradient, the foreground to orange (F0A400) and the background to yellow (FFEB42). Drag the gradient tool from the top of the selection to about 3/4 of the way down of it (image b). Duplicate the gradient layer, flip it vertically (edit > transorm > flip vertical) and then place them like in image c). Merge the 2 layers together and then duplicate them (image d).


This is the 2nd part of the Photoshop tutorial to create text with flowers. Next, zoom in to 200% and create a new layer and a path layer. Use the pen tool to create a curve (image a) and then drag the top segment of the directional line to the center (image b). Create a second curve, complete the path, make a selection using it, and then fill the layer with dark green (2B8E00).
a b c d
Step 5.
Feather the selection by 2, contract it by 1 and then fill it with a lighter green (B4FF92). So that's the first stalk create that we'll duplicate later, but first we're going to create some flowers. So, zoom in to 300%, create a new layer and then select the gradient tool. Set it to linear gradient, the foreground to orange (F0A400) and the background to yellow (FFEB42). Drag the gradient tool from the top of the selection to about 3/4 of the way down of it (image b). Duplicate the gradient layer, flip it vertically (edit > transorm > flip vertical) and then place them like in image c). Merge the 2 layers together and then duplicate them (image d).
Step 6.
Rotate the duplicate by 90 degrees (image a), merge them together and then duplicate it once more (image b). Rotate the duplicate by 45 degrees and then merge them together (image c). On a new layer, create a peach (FFC8D4) circle in the center, and then contract the selection by 2 pixels.


Step 7.
Set the foreground to dark orange (EA682F) and the the background to a lighter orange (FF965B). Fill the selection and then add noise (filter > noise > add noise), setting it to uniform and 17%.
Step 8.
This is the 3rd part of the Photoshop tutorial to create text with flowers. Next, make a new layer and then create a bright yellow cirlce underneath the peach circle. Nudge the selection to the right a bit and then delete the area selected. Duplicate the resulting shape and then rotate it by 180 degrees.
Rotate the duplicate by 90 degrees (image a), merge them together and then duplicate it once more (image b). Rotate the duplicate by 45 degrees and then merge them together (image c). On a new layer, create a peach (FFC8D4) circle in the center, and then contract the selection by 2 pixels.
Step 7.
Set the foreground to dark orange (EA682F) and the the background to a lighter orange (FF965B). Fill the selection and then add noise (filter > noise > add noise), setting it to uniform and 17%.
Step 8.
This is the 3rd part of the Photoshop tutorial to create text with flowers. Next, make a new layer and then create a bright yellow cirlce underneath the peach circle. Nudge the selection to the right a bit and then delete the area selected. Duplicate the resulting shape and then rotate it by 180 degrees.
Step 9.
Merge the 2 shapes together, duplicate it and then rotate it by 90 degrees (image a). Merge them together, and then duplicate it once more. Rotate it by 45 degrees, giving you something like in image b). Make a selection of the main flower part, create a new layer underneath it, and then fill it with a dark orange (E68D00). Zooming out, you should have something like in image c). Merge all the flower layers together, duplicate it and then resize it to 70% using the transform tool.


RESULT

Luminescent Lines
Assalam-o-Alaikum
Step 1
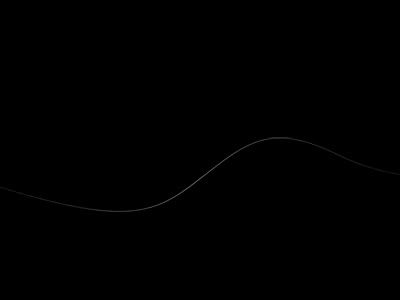
Start by creating a new document, here I used 1024x768px and 72dpi. Using the paint bucket tool (G) fill the background layer with black, alternatively you could use a dark gradient instead. Click the brush tool (B) then change the settings of this brush to a 1px round, white brush with 0% hardness. Create a new layer then select the pen tool (P) and in the main toolbar make sure paths is selected, now start slightly outwith the canvas on the left then using about four points draw a curve with a similar shape to the one below. Right click anywhere inside the document then select stroke path, make sure simulate pressure is checked then hit OK. Lastly hit the Esc key twice to get rid of the path.
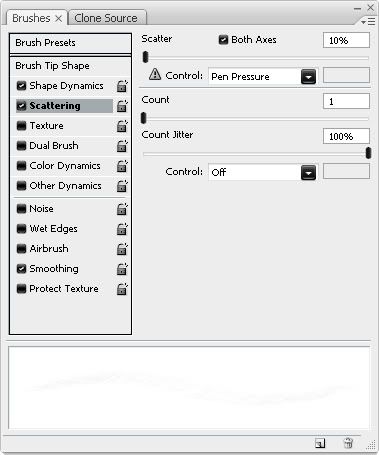
Step 2
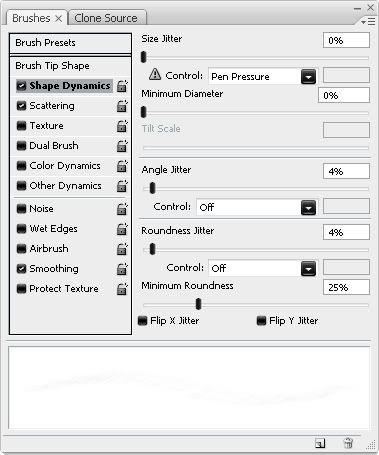
Now hold Ctrl and click on the layer with this curve in it, in the layers panel, this should make a selection around the line. Next go edit>define brush preset and save that curve as a brush. You can now hide this layer by c@@@@ the eye next to it in the layers panel. Select the brush tool again then bring up the brush settings by going window>brushes. Choose the brush that you just made then use the same settings as below.
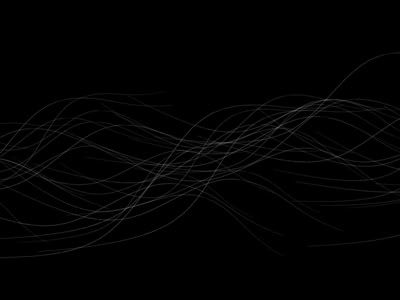
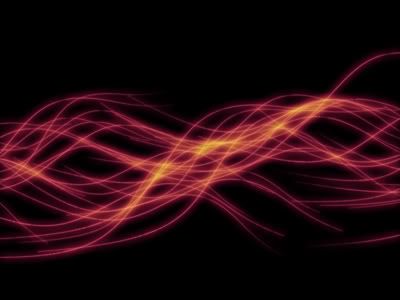
Step 3
Create a new layer to hold our lines. Okay we now want to use this brush to create the lines in the picture so first drag from the left of the canvas to the right until you end up with something that resembles the image below. Not that each line is slightly different, this is because in settings we made it change angle and roundness.
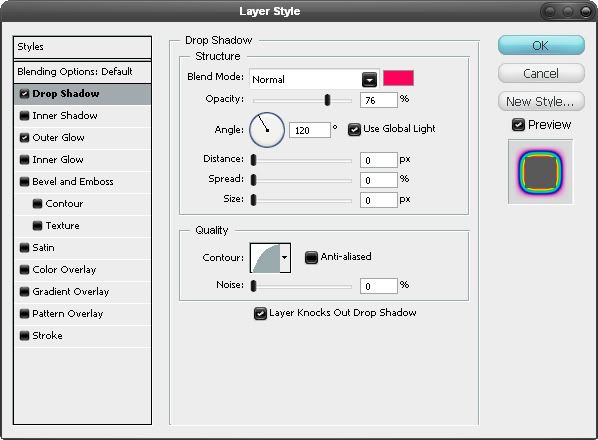
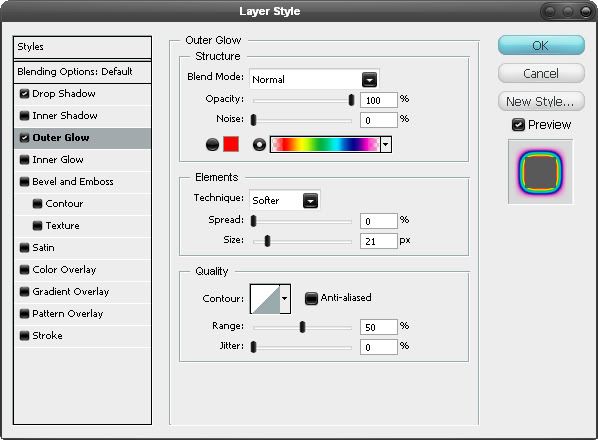
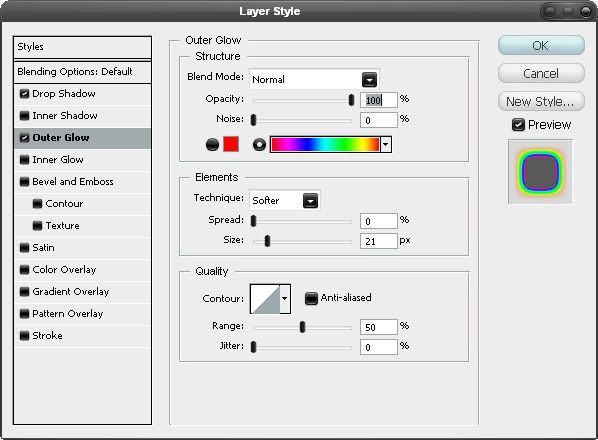
Step 4
Now we will make the lines glow so right click on this layer in the layers panel then select blending options. Use the settings shown below for a drop shadow and an outer glow. Note that although we used a drop shadow we are still using it to create a glowing effect this is because we changed the blend mode of this effect from multiply to normal.
Step 5
Right click this layer then select duplicate layer to make an exact copy. Now go into the blending options for this layer and the only thing we want to change is the gradient to the the other rainbow one because you will notice there are two different rainbow gradients, one has transparent edges and one doesn't.
Step 6
Optionally now you can blend out some of the ends of these lines by either using the erasor tool on both layers or a better way to do it would be to put both these layers in a new group then create a layer mask a paint it out some parts. If your happy with your image then skip on over to the next step.
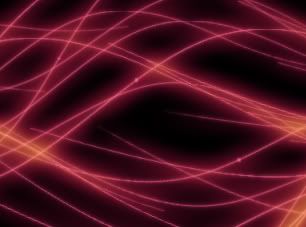
Step 7
Here I added some beads on the line, this can be done using the same technique from step 3 to step 5 except use a small 2px or 3px round brush instead of the brush that you made yourself.
Step 8
Now create a new layer and select a large soft brush then change the foreground color to a bright color and brush some random shapes. Repeat this with a few diifferent colors to end up with an effect like this.
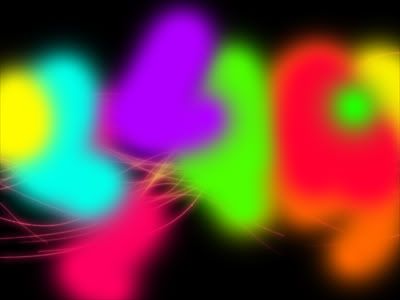
Step 9
Next go filter>blur>gaussian blur and use a value of around 100px then change the blend mode of this layer to color. I'll let you decide what opacity this layer should be but I used about 50%.
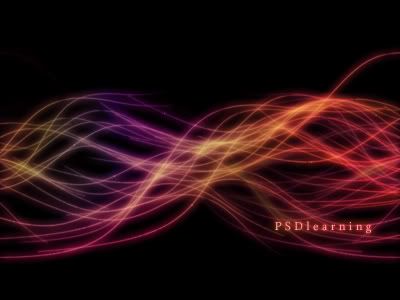
The End
Merge the 2 shapes together, duplicate it and then rotate it by 90 degrees (image a). Merge them together, and then duplicate it once more. Rotate it by 45 degrees, giving you something like in image b). Make a selection of the main flower part, create a new layer underneath it, and then fill it with a dark orange (E68D00). Zooming out, you should have something like in image c). Merge all the flower layers together, duplicate it and then resize it to 70% using the transform tool.
RESULT
Luminescent Lines
Assalam-o-Alaikum
Step 1
Start by creating a new document, here I used 1024x768px and 72dpi. Using the paint bucket tool (G) fill the background layer with black, alternatively you could use a dark gradient instead. Click the brush tool (B) then change the settings of this brush to a 1px round, white brush with 0% hardness. Create a new layer then select the pen tool (P) and in the main toolbar make sure paths is selected, now start slightly outwith the canvas on the left then using about four points draw a curve with a similar shape to the one below. Right click anywhere inside the document then select stroke path, make sure simulate pressure is checked then hit OK. Lastly hit the Esc key twice to get rid of the path.
Step 2
Now hold Ctrl and click on the layer with this curve in it, in the layers panel, this should make a selection around the line. Next go edit>define brush preset and save that curve as a brush. You can now hide this layer by c@@@@ the eye next to it in the layers panel. Select the brush tool again then bring up the brush settings by going window>brushes. Choose the brush that you just made then use the same settings as below.
Step 3
Create a new layer to hold our lines. Okay we now want to use this brush to create the lines in the picture so first drag from the left of the canvas to the right until you end up with something that resembles the image below. Not that each line is slightly different, this is because in settings we made it change angle and roundness.
Step 4
Now we will make the lines glow so right click on this layer in the layers panel then select blending options. Use the settings shown below for a drop shadow and an outer glow. Note that although we used a drop shadow we are still using it to create a glowing effect this is because we changed the blend mode of this effect from multiply to normal.
Step 5
Right click this layer then select duplicate layer to make an exact copy. Now go into the blending options for this layer and the only thing we want to change is the gradient to the the other rainbow one because you will notice there are two different rainbow gradients, one has transparent edges and one doesn't.
Step 6
Optionally now you can blend out some of the ends of these lines by either using the erasor tool on both layers or a better way to do it would be to put both these layers in a new group then create a layer mask a paint it out some parts. If your happy with your image then skip on over to the next step.
Step 7
Here I added some beads on the line, this can be done using the same technique from step 3 to step 5 except use a small 2px or 3px round brush instead of the brush that you made yourself.
Step 8
Now create a new layer and select a large soft brush then change the foreground color to a bright color and brush some random shapes. Repeat this with a few diifferent colors to end up with an effect like this.
Step 9
Next go filter>blur>gaussian blur and use a value of around 100px then change the blend mode of this layer to color. I'll let you decide what opacity this layer should be but I used about 50%.
The End


0 comments: